

Anvil Base - Stump Preparation
Traditional tree stumps as anvil bases are my favorites. They are pleasing to the eye and very serviceable. When fastened securely to the anvil, the stump becomes an integral part of the anvil and a heavy base makes a small anvil act like a bigger one. Preferably a stump should be buried 3 feet into the ground. When that is impractical, iron brackets fastened to the tree stump and the floor helps. Of course if the anvil needs to be moved periodically, fastening the stump down is not usually an option.
There are many ways to prepare a stump, but this is the one that works for me. This system works if the blacksmith knows how high he wants his anvil, as it is not a system for which the height is easily adjusted.
It is best to use a heavy wood that doesn’t split easily. Some non-splitting and heavy woods are American Elm (best but hard to find), Sycamore, Honey Locust, Walnut, Mulberry, and Sugar Maple. Woods that are heavy but split easily are Oak and Ash. Stumps that split easily can be strengthened by shrinking an iron hoop or ring around the top and bottom of the stump. A stump with a hoop that is shrunk on might need to be redone as the stump shrinks or the top and bottom of the stump can be tapered a little and then the hoop can be driven on tighter as the stump dries.. A hoop that is tightened by a bolt is also a practical solution. A hoop with a bolt can just be tightened as the stump shrinks. Often the local tree service company will have, or can acquire, a suitable stump. Lighter weight woods such as Cottonwood, Pine, etc. are last choice woods for an anvil stump as they are light weight.
The anvil should be fastened down to the stump very tight! A solid/tight fastening system stops both the bounce and movement of the anvil and diminishes greatly any ringing/noise. Wrought iron anvil bottoms are sometimes uneven, but they can be trued up by a machinist or with careful use of a belt sander or angle grinder. Generally a piece of leather, thin lead, silicone caulk, tar paper, etc. under the anvil helps the surfaces mate.
Anvil height is always a compromise. Old time blacksmith books suggest a height of knuckle height (that is the 2nd knuckle in the middle of the fingers). After trying several different heights, the one I like the best is the top knuckle height. Some blacksmiths suggest wrist height as being less hard on the back and easier for them, but I find it awkward given the methods that I use. With wrist height, I find that I need to frequently raise my shoulder uncomfortably high. I find that it leads to a stiff neck and uncomfortable shoulder at the end of the day. Remember that the surface being forged is often above the anvil face such as when using a hot cut, fuller, or just if the metal is thick. At times when working with a bar positioned at a 45 degree angle over the far edge of the anvil, the bar holding shoulder will naturally be high and a lower anvil is appreciated, but when doing so with the bar on the near edge of the anvil a higher anvil is desired - again a compromise is necessary or a different stance is required. The Uri Hoffi method of forging a bar is to stand toward the end of the anvil, looking toward the round horn, drawing out the bar which is 90 degrees to the anvil face, and with the hammer parallel to the outside edge of the anvil.. With Uri’s method a higher anvil can be used without raising the shoulder awkwardly high. Usually when working with a striker, a lower anvil is helpful.
Square the top and bottom:

Step 1
Cut log of sufficient diameter to length somewhere around 2 inches longer than desired. How much extra length depends on the straightness of the cut. Cut as square and straight as possible - typically with a sharp chain saw blade. The top of the anvil should be just big enough for the anvil to fit. If the base is too big around, the blacksmith can’t stand as close as he might want and the stump can interfere with longer forging over the horns. If the stump is too big around, it can be cut vertically to a rectangular shape instead of leaving it round.
Step 2
Determine the side of the base that is the most square and place it on the floor. If the bottom isn’t square enough, shim up the stump so the log/base is as vertical as you want it. Then fasten 2 straight scrap boards at least 2 ft longer than the diameter of the stump, one on each top side with about 1 inch sticking above the base. To ensure a square router cut, when fastening the boards, measure and make the top of each end of each scrap board the same distance from the floor. The floor should be somewhat flat for this operation.

Step 3
Make a sled for the router out of quality 1/4 inch plywood with some side supports of 3/4 inch by approx. 3 inch wood. A good size for the sled is 45 to 48 inches long, and 10 inches wide. The sled usually replaces the plastic router base. Then use the router/sled and flatten the top side of the stump. The router rides on the 2 scrap boards screwed to the stump.
Step 4
Turn over the stump, and repeat the process to flatten and straighten out the other end.
Router a 1/2 inch Deep Hole for the Anvil and Around 3 Legs:

Step 5
If the stump will be placed on a hard floor (cement, wood, etc.) mark 3 pads/legs on the bottom of the stump for the stump to rest upon. Route out the area between the pads/legs approximately 1/2 inch deep. This makes a 3 legged stump which sits best on an uneven floor. The pads should be a minimum of 6 to 8 inches in diameter to give enough support for the anvil and base. Another option is to route out the center and leave a 3 to 4 inch rim around the outside for the stump to rest upon.

Step 6
Determine if the stump leans out of perpendicular. A little lean is good as the stump can be positioned so the bottom of the stump is further away from the blacksmith’s feet. Once position is determined, mark the top of the anvil around the base of the anvil. Allow for some room around the anvil. If the stump is a little green it can shrink, and if too tight, might split the stump as the stump shrinks. Router out the place for the anvil approx. 1/2 inch deep.
Fasten Down the Anvil:

This is a good way to fasten down the anvil as long as the stump doesn’t split from the lag screw. The lag screw should be a minimum of 5 to 8 inches long and 1/2 inch diameter. A lag screw works great if the stump is American Elm, Sycamore or some other non-splitting wood. Woods which readily split require that the lag screw be put in at an angle so it cuts across some grain, or a different fastening system should be used. If using a wood that splits easily, bolts instead of lag screws going all the way through the stump are good, if the means of drilling that long of a hole is available. A long drill can easily be made by welding a 3/8 inch or even 1/2 inch rod to a spade, auger, or other type of wood bit.
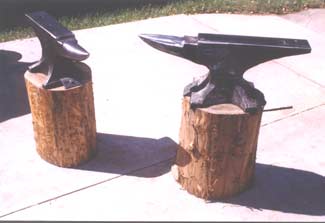
Two finished bases. Anvils ready for use. The anvil on the left is a 160 lb. Peter Wright and the anvil on the right is a 215 lb. Arm and Hammer.
ANVIL REPAIR:
Both of these anvils have had the edges repaired with Stoody 2110 work hardening welding rod, although now for anvil repair I use MG Industries 710 electrode. The Stoody is softer and is a different color than the original anvil face. The MG rod is 55-60RC as welded and is approx. the same color as original face metal. The cost for each type of rod is about the same, expensive. Even though some anvils are repaired with the common 7018 welding rod, the deposited 7018 rod will never be much harder than mild steel even where dilution occurs.
Remember that whenever a heat treated (hard) anvil face is welded upon, some of the metal next to the weld is heated to the point of taking the hardness out of that metal. There is no way around it. Nevertheless, if an anvils edges are all bad, welding is about the only way to repair an anvil and make it useable. Rather than welding up an anvil, it is often better to use a block in the hardy hole if square edges etc. are needed. See literature on repairing anvils or ask someone with experience before attempting to repair an anvil.